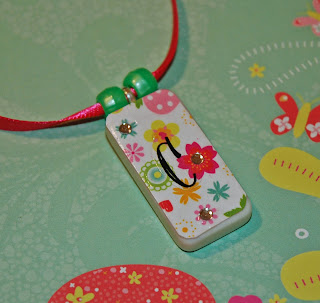
Here is yet another one of those projects to add to the list of ways to use up paper scraps. The possibilities for decorating domino pendants are endless with the paper, stickers, rub-ons and embellishments out there. These little cuties make great gifts too!
For this project you will need:
Domino (regular size or travel size - I used travel size for this particular pendant)
Paper scrapsAlphabet stickers or rub-ons
Rhinestones
Silver plated bail
E6000 (or other super strong glue)
Scissors
Mod podge
Paintbrush
Ribbon
Pony Beads (not shown here and optional)
1. Cut paper to size. You can either measure the domino and cut it down or lay the domino down and trace it onto the paper, then cut it out.
2. Affix letter sticker or rub-on to the paper.
3. Apply a layer of Mod Podge to the domino and place the paper on it, lining up the edges.
4. Then apply another layer of Mod Podge over the paper.
5. While the Mod Podge is still wet place rhinestones or other embellishements. The rhinestones I used were so small, I dipped the tip of a toothpick into Mod Podge and used that to gently place the rhinestone where I wanted it.
6. After the pendant has dried. Turn it over and using your E6000 glue your bail to the pendant.
7. Once the glue is dried, you are ready to string up the pendant on a pretty cord or ribbon. Here, I used a couple of pony beads to dress it up a bit.
There you have it!
Happy Crafting!
I'm linking to the following:
Plant a Punkin' Seed Party at Punkin' Seed Productions
It's a Hodgepodge Friday at It's a Hodgepodge Life
Get Your Craft on Thursday at Life as Lori
Look What I Made! at Creations by Kara
A Little Craft Therapy at Life in the Pitts
Strut Your Stuff at Fireflies and Jellybeans


Very cute Lanie - don't forget to plant your creative seed at "Plant a Punkin Seed Party" on Friday!
ReplyDeleteKristi
Punkin Seed Productions
So cute! I have seen these before, but I didn't realize how easy they are to make! Thanks for sharing!
ReplyDeleteWhat a cute project. I had no idea it could be that simple to make. I like how you dressed it up with the pony beads, too. It's a nice little extra touch.
ReplyDeleteThat is so cute. I have often wondered how people did these. Thanks so much for the tutorial I am going to try this (once I slowly collect the supplies) I am bookmarking this one!
ReplyDeleteI wanted to invite you to my first blog party on March 20th. I am hosting a "Gifts from the Heart Challenge" Where you show off your homemade gifts you have given people. I hope to see you there!!
How cute! I decorate dominoes too. I use inks on mine. Got a few on my blog in some past posts.
ReplyDeleteHugs,
Tara
very cute! I love the paper you used! : )
ReplyDeleteThat is super cute! Come stop by my Favorite Things Friday Party if you would like to join in!
ReplyDeleteA neat idea - I've got dominoes...
ReplyDeleteVery cute project!
ReplyDeleteFollowing you from the Friday Follow!!
Nicole
www.myrealreview.blogspot.com
This is really cute, I love it!!!
ReplyDeleteSo cute! Thank you so much for sharing the tutorial. I'm going to have to try this.
ReplyDeleteI'm visiting from New Friend Friday. :)
- Michele
Aw, this is adorable!
ReplyDeleteThank you for linking this to A Little Craft Therapy with Life in the Pitts!
Great project! ...very well done! I hopped over from "Hodgepodge Friday" and am so glad that I did! Please accept my invitation to drop in at my place sometime soon when you get a moment. until later...
ReplyDeleteLove it! I have one of those necklaces, they are so cute.
ReplyDeleteLanie, thank you for being such a support to me from the very beginning! You're a great bloggy friend. Thank you for linking up to It's a Hodgepodge Friday! I love seeing what you have been up to. I hope to see you again.
ReplyDelete~Gay~
itsahodgepodgelife.blogspot.com
I just bookmarked this one! I love it.
ReplyDeleteThanks for joining Get Your Craft on Thursday! Please join me next week for another wonderful party!
Very cute Lanie - thanks for linking up to Plant a Punkin Seed Party. Come back and plant another creative seed! Hope you've had a great week!
ReplyDeleteKristi
Punkin Seed Productions